How to Careen a Boat
Photo credit: Jeffery Ram
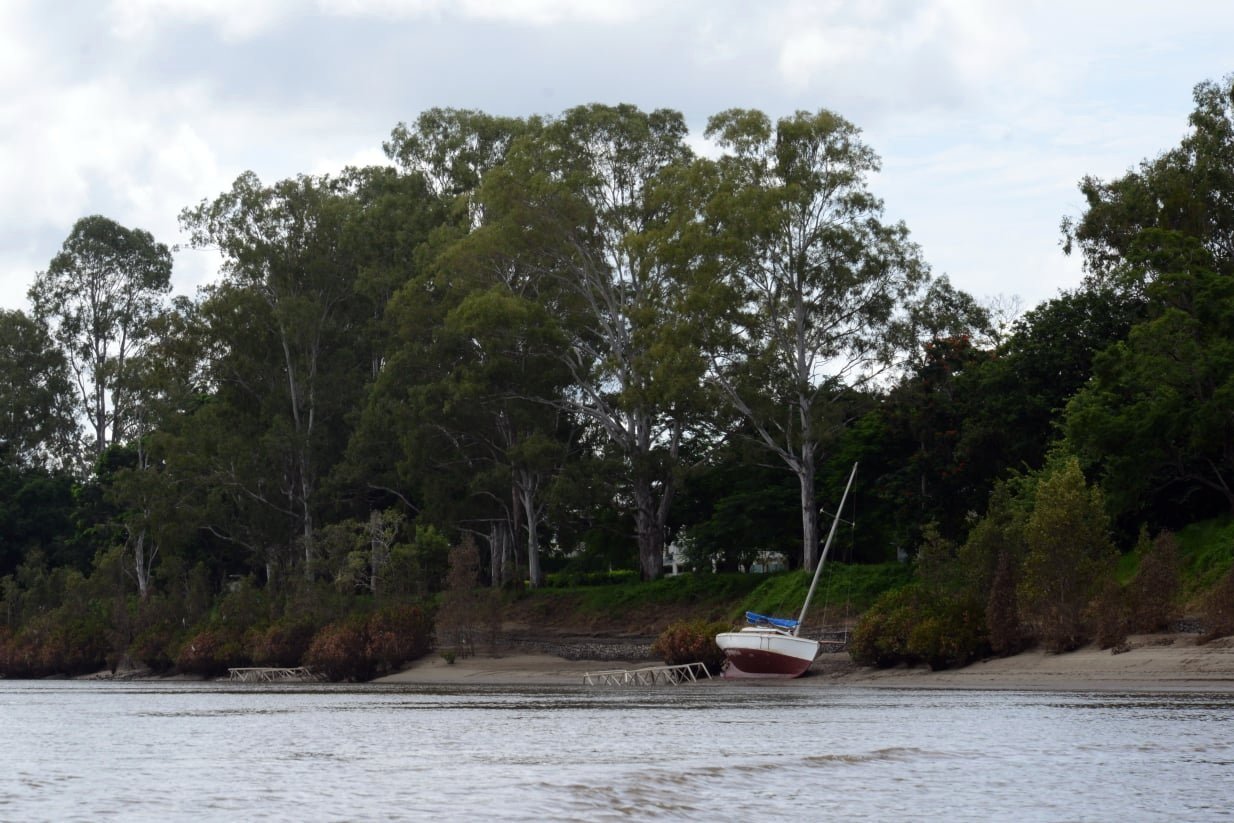
Last week I set about careening Arana.
I’ll be flying over to Peru in a matter of weeks, so I’ve got a few loose ends to tie up before I put my 21st century life on hold for a year. The most pressing of those matters is the annual care and maintenance of my other boat, ARANA, a 27’ gaff cutter. She is due for an antifoul, an important job in maintaining her condition. Sadly, the slipway I usually use was badly damaged in the recent floods, leaving me wondering what I was to do. Unfortunately there aren’t many slipways in this part of the world, so it would be a bit of a steam to get to one, along with the associated costs. I really wasn’t sure what to do, when it occurred to me that I could careen ARANA.
I had never careened a boat before, but thought it seemed like a perfectly suitable way to do my annual maintenance. To careen a vessel one needs a suitable location, the bottom must be sandy, a muddy bottom would cause her to sink into the mud and a rocky bottom would likely cause damage, a large tidal range is also necessary, and the bank must be relatively flat. There’s plenty of suitable spots around Moreton Bay, but they would involve at least a full day steaming to get there. Here on the river it’s almost all muddy, with steep banks. Fortunately, I found a suitable spot with a sandy beach. This location will remain nameless. I was a little apprehensive of the process, as there is a risk, with certain hull shapes, when the tide comes back in, that the decks become awash before the hull floats, and the boat fills up through the ports, companionway etc. I spoke to a few old friends that had careened their boats in the past. Peter Davies came up with the best response to my query. He stated: “If she goes down fine, she’ll come up fine”. Once he said that, it was so obviously true; as long as she doesn’t fall over as the tide drops, the she’ll come up just fine. ARANA only draws 3’ 10” so I knew she wasn’t going to heel over very far as the tide dropped, in fact the water only came up about a foot over the waterline. Most traditional boats are suitable to careen, there are exceptions however, such as the extreme ‘plank on edge’ cutters. They would most definitely ‘fall over’ as the tide dropped, risking internal flooding. That little bit of wisdom from Peter assured me of a successful careening.
A ‘plank on edge’ hull form
So, I set off one morning to my secret little beach. I got there at the top of the tide, and motored the boat until the bow grounded. I then shut the motor off and jumped overboard, with a stern line, into waist deep water. I then pulled the stern around until she was parallel with the bank, and tied her off. All I had to do then was wait as the tide dropped. I put the anchor and some chain on the port side, adding a bit of weight to ensure she would fall on the correct side. As the tide dropped, I began to scrub her starboard side with a broom, very easy indeed.
Once the tide was out, and her hull was exposed, I couldn’t believe how simple it had been. Even compared to a conventional slipway this was a breeze. See, to slip ARANA normally, I would have to blast the mud away from the slipway rails at low tide, a job that takes a few hours, sometimes over a few days, I then have to set up the cradle. Then the day of the slipping comes, a bit of an exercise that involves mucking around to ensure she sits properly on the cradle.
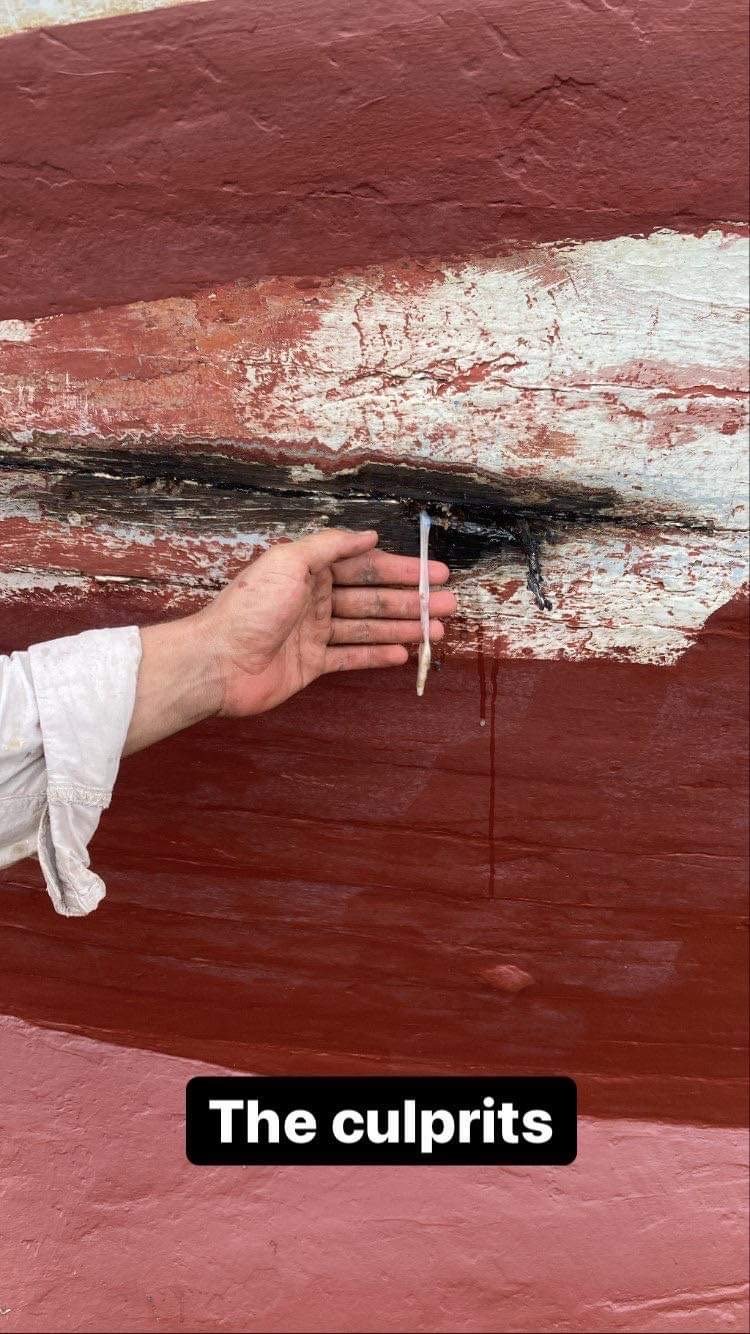
Drying out Arana was a breeze! I was feeling pretty good about myself at this stage, I’d scrubbed the bottom and was starting to think about applying some primer to the bare patches, ready for antifoul. Then I looked a bit closer and found some holes… I was poking around a seam with my knife, when it went right through the plank. Bloody worms!! You see, here in sub tropical Queensland, wooden boats, piers and underwater structures are prone to destruction from Teredo Navalis, or shipworm. These pesky molluscs’ purpose in life is to eat timber, something they do very well. Teredo can sink a ship in a matter of months. Hence the importance of a protective antifoul coating, the only deterrent against our tenacious enemy. Unfortunately, it had been about 18 months since Arana was last slipped, and in that time, in a few places the antifoul had rubbed of completely.
At the point in which my knife went through the hull, I realised I had to move fast, I had six hours of daylight, and another few until the tide came back in. It was go time.
Luckily, a couple of mates were going to come down and check out the spectacle. I rushed home and grabbed my tools, meeting the boys there. We drove in a comical convoy to the beach, and set to work. There were three spots where worms had entered the hull. One was bad, and would need a section of plank replaced, the other two were only minor and could be filled with epoxy. The problem with worms is that they can survive up to six weeks out of the water, so one has to burn them out of existence. The old trick involves a coat hanger and a heat gun. The wire is bent straight, then heated up and pushed into the holes that run along the length of the plank. Hopefully the end of the wire finds the end of the tunnel, and a satisfying sizzling sound is heard, followed by some steam. This work is awfully stinky, those worms are downright disgusting; resembling a sci-fi underwater monster. We managed to extract a few, by pulling them out from the rear. The boys were suitably amazed at these creatures.
Once we removed or burnt them all, it was a rush to get new timber and epoxy back into her, with enough time for the glue/filler to go off before the tide came up. Epoxy is a handy material when dealing with worms, but is often overused. During my apprenticeship, I often found recent worm damage next to epoxy filled holes, meaning the worm lived on even after the entrance to their hole was filled. It simply isn’t good enough to fill the holes, these buggers need to be killed ‘good n proper’, before any epoxy can be applied.
Once the worst plank was exposed, it was time to get stuck in with a chisel and mallet to take the plank back to good timber. Once this was done I made a new ‘graving piece’ as we say here. I planned a caulking bevel on the bottom edge, then fitted it with epoxy on the top edges, and fastened it with 2 bronze screws into the ribs. While I was doing this, Callum was applying antifouling to the rest of the hull, and Jarrod, who happens to be a plumber, was cutting copper patches, know as tingles. The tingles were bedded in polysulfide compound and nailed over the repairs. They were probably unnecessary, but I thought it wouldn’t hurt, seeing as i’m not sure how long I will be away for, and they will let me easily find the repairs again next time I slip her, enabling me to revisit the areas if need be.
With a good team, a couple of beers and an all-round fun atmosphere, we managed to get her fixed up and caulked well before dusk, all making it home in time for dinner!
The next day I went down to the beach at high tide and turned ARANA around. I was praying that she wouldn’t have the same damage on the port side. It was raining pretty hard, but I scrubbed the bottom and found her to be in good condition; what a relief. Unfortunately, the rain put any painting on hold for 2 days, nonetheless she continued to ground and float once a day.
I was able to get a coat of antifoul on the next afternoon, as well as replacing a skin fitting. The next morning she floated again and I jumped on board, fired up the trusty diesel, and motored away.
The best part of the whole experience was the simple pleasure I gained from a successful attempt at trying something new. I got a big kick out of reviving a traditional art. I wonder when the last time someone careened their old gaffer on the banks of the Brisbane River?
It does make me wonder. The whole process was so simple and easy, I can’t understand why it isn’t more popular. I know it was commonplace in these parts 100 years ago. So why aren’t people still doing it? It seems as a society we are too quick to adopt the latest and greatest, at times losing sight of the simple alternatives.


